Showing posts with label diy. Show all posts

Thursday, 7 June 2012

Project Repair Hair - Phase One


If this is the first you're hearing of my recent hair trouble you can see the original post here.
In an attempt to somewhat repair the damage yesterday I started with a DIY deep conditioning treatment. I mixed together a healthy dose of Moroccan Oil and this hair mask I received free in Glamour - I believe. The hair mask alone is actually really nice and having tried it on my pre-ruined hair I thought it would work well for this. I've done A LOT of research into hair damage this week and this method has come up time and time again so I thought I'd share it.

After slathering my lengths and ends (avoiding my healthy roots) in the mixture I popped on my Soap & Glory turban which I'd microwaved damp so it was toasty and warm. I then microwaved a second wet towel and bundled that on top in an effort to contain the heat. I did have to reheat the top towel once every 5mins or so during the treatment to keep everything warm but it wasn't so much of a hassle as I'd made myself comfortable in the kitchen by this point.


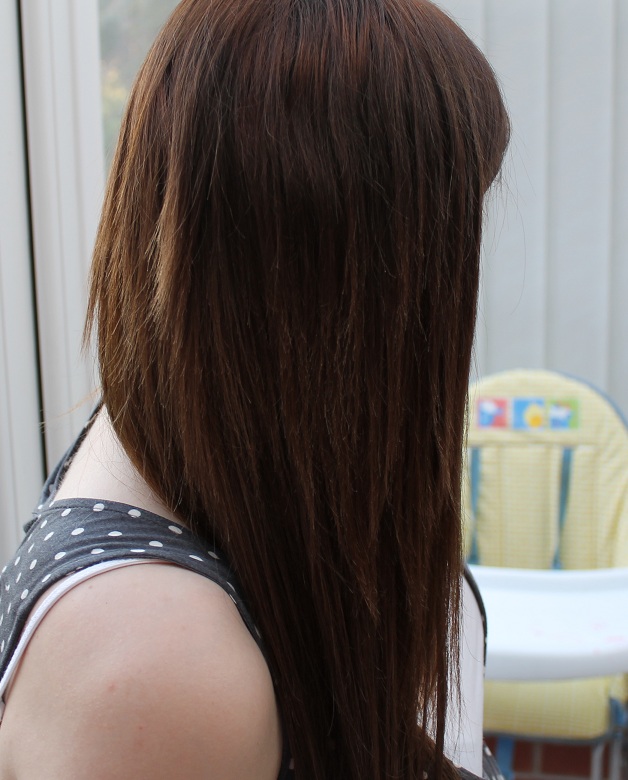
You can see my freshly chopped locks for the first time below..


I had already cut more than an inch of my ends myself in an attempt to save the rest and althoughthis treatment didn't restore health it definitely smoothed and conditioned.. it helped!
Also.. Note how straight my hair is. The straightening treatment worked I can't deny that but it absolutely wasn't worth the hair horror that ensued!


Unfortunately I'm still frazzled so step 2 will be protein. I ordered treatments from Redken and Aphogee, The Redken arrived as I was typing this but I'm going to hold out and use the Aphogee first as I've heard the results can be amazing. It's a salon brand and from what I've read it's not pleasant to apply but I can't wait to share that with you. You do have to be careful with protein as if you overdo it or your hair doesn't need it can also be very damaging so I'm nervous but when used properly it sounds like an absolute miracle product.


Aphogee was recommended to me on twitter and I'd never have heard of it otherwise so please, if you have any suggestions, let me know!

Miss BB

Monday, 4 June 2012

Play It Straight? I Wouldn't Recommend It!


I picked this up at my local supermarket back in March specifically to review for you guys and just never got around to it so decided this weekend was as good a time as any. Before I used it of course I checked for other reviews but surprisingly I found none. I did find several sponsored posts promoting it but nobody that had actually used it... strange, I thought. Because of this I wanted to offer thorough step by step pictures as well as before and afters for those searching for them like I was.

Included in the kit:
Smoothing Serum
Sealing Cream
Plastic Gloves


My hair is naturally wavy, above is the result of sleeping on it damp. The got2b kit promises smooth sleek, manageable hair which is quicker to dry and leaves natural curls more defined.

 
The Directions say to wash and towel dry your hair and split it in to 4 sections. It's apparently important not to use metal clips to do this but I don't know why. You should then smooth the serum on to each section evenly and comb through. The processing time for this stage is 20 minutes, it instructs that you leave your hair down for that time and comb through regularly to keep it straight.


Once the time has elapsed rinse thoroughly and again towel dry and section before applying the sealing cream. You need to keep it straight for 10 mins this time, regularly combing through again.


Above you can see the condition of my hair after both treatments.


The packaging suggests you should blow dry and straighten for best results but truth be told I could barely get a brush through my hair while it was wet. I had to use a great deal of Macadamia Healing Oil to get it to the state you see in the photos above and below

In fairness my hair is very straight but it's absolutely ruined.


The pamphlet warns to be cautious when using on bleached or damaged hair but my hair was in decent condition so I saw no reason to be wary. Unfortunately it's not anymore and I see a substantial cut in it's future thanks to Schwarzkopf


As I type I have a concoction of Philip Kingsley's Elasticizer and the Body Shop Shea Oil slathered on my ends and wrapped in plastic in the hope it will save me some inches from the salon shears but I've accepted I'll have to make an appointment very soon.


I'm not going to say this is a terrible product but much like the John Frieda Go Blonder range you need to know what you're putting on your hair. This product contains hydrogen peroxide so the damage you experience will not be dissimilar to that you would when using an at home bleach. For someone with virgin hair that's coarse, wavy or unruly this would probably work really really well but it IS going to cause damage! When I bought it I kind of expected more of an at home Brazilian blow dry which some of you may know contains keratin and is a highly nourishing treatment.. this is more of a DIY chemical straightening. I did check the ingredients before use and saw HP listed but I just had no idea how strong it would be.

My advice would be if you're trying to be kind to your hair (like I was) avoid this at all costs but if you're looking for a super strength straightening system for a bargain price and you think your hair can handle it then this will absolutely do the job. It's not a conditioning treatment and will not leave it any more manageable but by God it will straighten!

Schwarzkopf Straightening Blowdry Kit
Currently available at boots here for £5.49

Miss BB

*Although I couldn't find any other blog reviews online there are 2 reviews on the Boots site that echo my experience. If you have tried this yourself or do have a review to share please leave it in the comments as I'd love to hear others opinions of this product. I have contacted the company regarding my results and will update here once I receive a response

NOTE:
From 1st July my blog will redirect to missbudgetbeauty.co.uk 
This is no longer a blogger blog therefor GFC will no longer pick up my posts.
To stay up to date you can follow me via blog lovin' or hello cotton

Wednesday, 18 April 2012

Gallery Wall

I've been completely obsessed with gallery walls for as long as can remember. As a kid my parents always had all of our school pictures on the wall and far from feeling the standard embarrassment as I grew older I loved them. They've since downsized to a selection of black and white old photos, all professionally framed to match (I'll get a picture at at the weekend) and it looks so much better. This week I've been trawling Google images for inspiration for my own picture wall...


Here's the space I have to fill, there are several annoying things about it already eg. the messy paint job and off centre clock but it just looks so plain. I'm in two minds as to whether or not to paint over the two 'feature walls' either side of the chimney breast to match the rest of the room but I worry it will look even more BLAH. It needs something and I think that something is a gallery wall!
I have my photos edited ready and have ordered these frames so hopefully I can get up in the next week. I also finally ordered the wooden letters I wanted, a big L and M and small M and E (us and the kids) but I'm not sure whether to stand them on the mantle or hang them amongst the pictures on the wall. How would you use this space?

Miss BB

Thursday, 29 September 2011

Home Hair Extensions - How To


I've thought about doing this a lot since I chopped my hair off in February. I used to use glue-in hair extensions all the time a few years ago before I discovered clip-ins and decided they were the be all and end all. The problem with clip-ins for me is that I can never be bothered to put them in and when I do they feel loose or tug my hair and more than anything else they feel bulky on my head. Being pregnant there's not a lot you can do to make you feel more attractive as you get heavier so I guess that had something to do with why I finally bit the bullet today. I know I'll probably regret it.. I remember the nights of picking glue out my hair but I couldn't help myself. I did buy the weaker glue (not the liquid gold I used to buy) and some remover so I'm keeping everything crossed it's got easier in the last few years.
They took less than an hour to put in.. more like 40mins actually, so it will really depend on how easy they are to remove and how long they last as to whether this will be a regular thing.. we'll see. I love the extra length. I didn't want them too long so I went for 14" and I think they blend quite well.
I knew I wouldn't be able to let this change go without explanation and anticipated lots of "how do I?" questions so figured I'd take some pictures by way of tutorial. 
I bought 4 strips (£6 each) , I bought 2 different shades in the hope it would look more natural as my hair isn't one block colour.  You can see below on the left how they look wrapped up and on the right each width unravelled. I alternated the two shades when I applied them to my hair.


Here's my before... 

When I sectioned my hair nobody was more surprised than me at the colour of it.. since I used Colour B4 last week I thought it had lightened up overall but turns out the layers underneath lifted a lot more...Disappointing to see my roots though.. I haven't bleached my hair since February.. I don't think that's much growth for 7months! Anyway... so I sectioned my hair with a tail comb...


I applied a thick line of glue to the "root" of one strip of hair and left it a couple of minutes to go tacky..


Hopefully you can see from the picture below but in a nutshell I attached it as close as I could get to the roots of my own hair. You may well need help (I did... Lee did most of the work if I'm honest)
One thing to make sure of is not to get any glue on the upper hair you've sectioned away!!!


Repeat for as many layers as you feel necessary to get a believable thickness. I think I could have done with a couple more but hey ho... next time! Forgive my badly straightened hair below but this was just after application. Add some waves and serum and the extensions are barely detectable. I'm really pleased with them! You can be sure I will rue this day when I come to remove them but I will be blogging that experience too so watch this space.


How many of you have tried DIY glue-in extensions?


Friday, 1 July 2011

DIY neckline...

I picked up this dress from Primark for a bargainous £3. I knew I wasn't 100% sold on the cut but at that price I had nothing to lose if my alteration didn't work out.
Firstly I HATED the gold buttons down the sides (you can't see them well here but trust me... they were there) So first thing I snipped those bad boys off!
 Next up I took my scissors to the centre of the neckline and cut to my preferred depth. I folded in the excess fabric and put a couple of stitches in to hold it in place and voila...
The original neckline was so unflattering on me.. and quite possibly on anyone. What I have now is something much more my style and it took me 5 minutes, TOPS!
Don't throw away an item that you're not in love with anymore before getting a little creative first. If it doesn't work out you've lost nothing but if it does you've given it a new lease of life and you'll feel that little boost of pride every time you wear it knowing you had a hand in it's custom style.


Friday, 3 June 2011

Painting is laborious

I can't believe I have had one whole week off work and on at nearly 2pm on Friday afternoon I am sitting down to write my first blogpost. I have been incredibly busy with the house. I have been saving lots of jobs, big and small, for our week off and we have near enough completed them all.. though we left many til the end of the week and rushed through them. We have decorated the nursery, the hall, stairs and landing have been freshly painted, the grungey yellow kitchen with plaster coming away from the walls has been refreshed and painted at bright white an our own bedroom has been given a new grown up feel going from a pastel lilac colour to an aptly named "Cappuccino" to match the lamps and bedspread. I'm pretty much loving all of our handiwork right now, basking in the fruits of our labours as I type this. I even freshened up my makeup room, the cupboards were chocked full of crap, I threw away 3 bin bags full of rubbish from the smallest room in our house and now my handbags and magazines are nicely organised, I have a shelf for lotions and potions and even a desk and a cork board for... umm... work and stuff?
It's really coming together and I can't wait to show you all. It's not finished, though it's not likely to be for a while so I might give you a bit of a preview this weekend when everything's tidy. I'm possibly most pleased with our bedroom which as it happens took the least time. It's like a haven now which was really important to me given that sleep will soon become a luxury. My skincare and random bedside junk was cluttered, there were DVDs EVERYWHERE and in short it looked like student housing but now... it looks like a bedroom fit for a mummy and daddy :)
I even gave Ella a new pink wall panel, she's wanted her room painting pink for quite some time but it's a large and awkward shape so one wall will have to suffice for now. She has a new bed a copious drawer space where previously her clothes lay in unruly piles. I'm sure just a little pink will be fine with her.
The kitchen was the biggest undertaking and I'd like to take this time to mention I did it.. ALL BY MYSELF! That's not to say Lee was laying out watching TV, he was set to work also but the kitchen decorating project was my baby and it is so gorgeous now, gleaming white and clean. Unfortunately I painted one of the walls and I went back to do another coat but the plaster all bubbled up, cracked and peeled off so theres an unsightly ridge where I had to peel back as much as I could before it could be repainted. A minor blip though and fortunately the wall in question is situated behind the door so it's rarely seen. I took down the horrible grubby blinds which improved the whole room enormously and it just looks fab.
We rent our house and are subject to occasional inspections so I was almost jumping for joy when we got a notice of inspection for next week. I like the idea that out hard work will be appreciated while it's still brand new. We've been here for 2 years and plans to stay at least a couple more, it feels like home now and after all the effort we've put in we want to live in it for as long as we can.
Anyway this was a much longer post than I intended for it to be but I just couldn't believe I'd gone so long without posting. I suppose had I merged all of my blogs in to one that would not happen as I am posting on my other blogs in between my posts on here but as I've said before.. I split them up for you guys, not for me, so hopefully if you are interested in the other stuff you will go and follow those blogs to be updated more regularly! In case you didn't already know the tabs at the top of this blog lead you to the other blogs I have on pregnancy, wedding planning and cooking. I blog here most of all but you might miss something if you don't follow them all.
I hope you are enjoying my "homesyle" blogs as much as the makeup/fashion type stuff I do too. I am sooo interested in other peoples homestyle blogs so if you have one of your own or want to recomment one PLEASE leave me a comment because I can never find enough fab ones.
My recommendation to you guys would be lovemaegan.com I love her stuff so much and her outfit posts will leave you green with envy!
I'm signing off now because I seriously am just rambling... this was basically a transcript of a youtube video at this point haha. I will leave you with my current favourite bedroom inspiration picture...
That's like the colour of my bedroom walls now but my furniture is light wood!
Look out for previews soon!!!

Saturday, 12 March 2011

24hrs in BLEACH

Here is the video I made whilst dying my hair...


...And my big "reveal" video...


Ok so it's fairly safe to say I've ruined my hair :/
Why I do it I don't know but I think this time I've learnt my lesson.
Over the past few days I've used colourb4 taking my dark brown/black hair to a lovely auburn red shade... not for me, I dyed it a "light brown" which proved to be darker than it had been BEFORE the colourb4 so ... back to square one. Then I decided to bleach my hair... then again... then I dyed it a dark blonde because it wasn't lifting and I had yellow roots and ginger lengths... this dye evened it all out pretty well but by day it looked pretty terrible on me so something had to be done. I of course (less than 24 hours later) bleached my hair TWICE more and then toned it... by this time the bottom 3 inches were like chewing gum and impossible to comb/brush, but my hair was still very yellow/orange/uneven from the bleach... so what did I do?
Dye it of course! So for the final time I used a medium ash blonde and it seemed to eradicate most of the yellow tones and leave me with a pale gold blonde... rather flattering and I can live with it ... GOOD NEWS! 
Of course my hair was trashed, I mentioned before that I had a hair appt and I intended to have a long bob cut but in all honesty I couldn't face a hairdressers judgement so... I cut it myself (with a little help in the back from Lee) ... I must be absolutely CRAZY! 

I actually really love the cut and the colour is nice, I will probably use a toner again to lift the remaining yellow tones but otherwise I think I'm done, my hair needs a serious rest. The last time I did anything remotely as reckless I had to have a pixie cut (I cannot pull that look off) so I was off my head to do this but I am what they call a beauty addict... this is my addiction...
I have joined a program and put down the bottled blonde
Hopefully my mistakes will help someone else and my hair isn't beyond repair.. oh and my journey has made for good TV lol..
Either way, it's done now, I'm off to have fun... I've heard that's what blondes do :P


Thursday, 10 March 2011

BLONDE AMBITION

I'm doing something a leeeetle bit reckless... I'm bleaching my hair. I must be crazy! It's in much better condition right now thanks to Lee Staffords wonder treatment but it's still a dangerous to be messing around with it when it's been so damaged. All the same that's just the kinda gal I am and I have a hair appt booked on Saturday to have a bit of length chopped off so hopefully that will help :).
Sooo... while I sit here typing with the bleach still in my hair I am googling blonde celebs for my new hair-spiration and I do believe I've found it...

The beautiful Reese Witherspoon

So wish me luck on my blonde crusade
Will post results verrry soon


Related Posts Plugin for WordPress, Blogger...